The Model 3/Y doesn't come with Biohazard Mode as an option. We felt you deserve to have high-quality filtered air as well. This is made with a new 3M HEPA filter media. It also has activated charcoal to combat bad odors

Step-by-Step Guide: Replacing Tesla Model 3 Cabin Air Filters
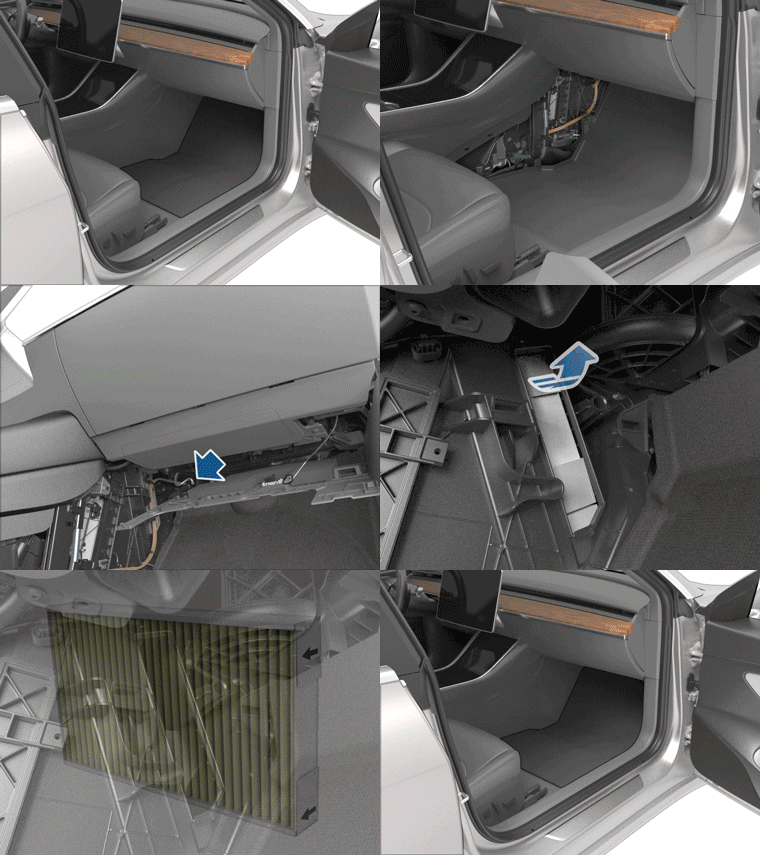
- Turn off the climate control system.
- Move the front passenger seat fully rearwards and remove the front passenger floor mat.
- Working from top-to-bottom, use a trim tool to carefully release the right-side panel from the center console.
- Use a clip pry tool to carefully release the push clips that secure the front passenger footwell cover to the instrument panel. Then, while supporting the footwell cover, disconnect the two electrical connectors and move the footwell cover aside.
- Remove the T20 screw that secures the cabin filter cover to the heating, ventilation, and air conditioning (HVAC) module then release the cabin filter cover and move it aside.
Note: If the HVAC module does not have a cabin filter cover, reinstall the trim panels and contact Tesla.
 Warning: Do not stretch, bend or otherwise damage the orange High Voltage (HV) cables that are attached to the cabin filter cover. If the HV cables are damaged, immediately discontinue this procedure. HV shock can result in serious injury or death.
- Fold the upper cabin filter’s tab upward and the lower filter’s tab downward.
- Holding the tab on the upper cabin filter, pull the upper filter out from the HVAC module.
- Holding the tab on the lower cabin filter, pull the lower filter upwards and then out from the HVAC module.
- Ensuring that the arrows on both new filters face towards the rear of the vehicle, insert the lower cabin filter into the HVAC module and lower it into place. Then, insert the upper cabin filter above it.
- Fold the tabs inward so that the cabin filter cover can be installed.
- Install the cabin filter cover by engaging the lower cover tab then securing the T20 screw using. Tighten the screw to 1.2 Nm/0.89 ft-lbs.
- Reconnect the two electrical connectors to the components in the front passenger footwell cover, then resecure the cover with the push clips.
- Align the right-side panel with the front and rear locator slots on the center console, then apply pressure until all of the clips are fully secure.
- Reinstall the front passenger floor mat then move the front passenger seat, back into place.
Pack of 2 pieces.
Compatibility:
Fit with 2020-2024 Tesla Model Y and Model 3.



